Introduction to the DBTL Bootcamp
Introduction » Design » Build » Test » Learn
An iGEM Story: You’re brainstorming iGEM project ideas with your team and you’re excited to voice a novel synthetic biology approach to detect early-stage cancers! You already have some of the DNA parts you would need, and you can synthesize the rest. You even have the general genetic circuit design in mind, so let’s start ordering!
But, your advisor asks that you take a step back. They ask how might you actually test the components of your design, what expectations about target specificity can we make based on modeling, and how will you generate data that you can share and compare with other groups?
All of these questions might be a bit disheartening, but they are important ones, and there are so many tools and resources available to address these challenges. And the Design > Build > Test > Learn (DBTL) cycle can help you address these in a systematic way.
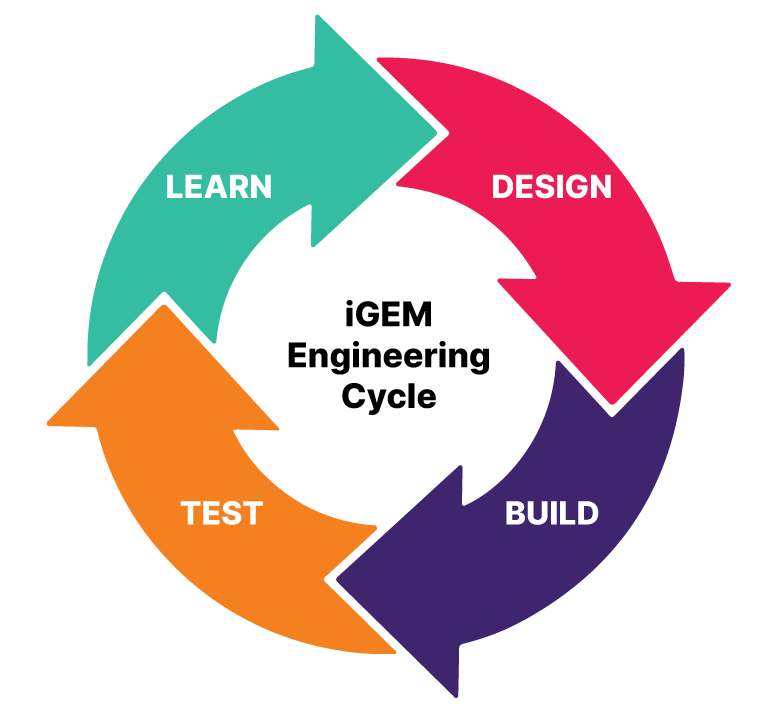 The DBTL cycle
What do we mean by a bootcamp?
A “bootcamp” is a short, defined set of activities meant to help someone become familiar with or learn how to do larger related activities.This iGEM Engineering Bootcamp will help you learn about the Design > Build > Test > Learn (DBTL) cycle that is important for engineering biological systems. This should serve as a brief introduction (or possibly refresher) to designing and building genetic circuits. You will then be able to test your built genetic circuits and then analyze and learn from your experiment.
More specifically, the DBTL Bootcamp will take you through designing, building, testing, measuring and analyzing quantitative data for three green fluorescent protein (GFP) reporter constructs of varying promoter strength.
Your iGEM project’s aim, DBTL cycle, as well as the tools and techniques used at each stage, will be more complex than this, but we hope you will find some useful approaches and tools that you can apply to your project.
Note, this is not coursework, nor a full course! You will need to have some knowledge in advance, seek more information yourself, and get used to some terminology that you may not be used to. Some of this we will cover in sections like prerequisite knowledge, and linking to additional resources. Others though, you may need to look up yourself.
Finally, as you proceed through the Bootcamp, if you have any questions or issues, you can reach out to us on the iGEM Global Slack’s #competition-engineering channel.
NOTE: DBTL Bootcamp BETA
This is the Engineering Committee’s first bootcamp! There may be errors, further guidance needed, and other elements that would improve the documentation here. As such, we expect that this document will change over time. We will mark each major revision as a new version.
What you should know before you start
Each module may have some prerequisite knowledge, but before beginning the DBTL Bootcamp, you should understand …
- gene expression in E. coli, and a parts-based approach to designing a transcription unit in a plasmid. This includes how a constitutive promoter, transcription, translation, etc, works.
- how restriction enzyme assembly, and specifically how Golden Gate Assembly works. For a refresher, the following may be useful:
- familiarity with SBOL Visual for genetic design representation.
- some terminology! Terminology can differ across labs, and that can cause confusion when communicating assembly plans, we recommend having a look at some past work on this topic from the iGEM Engineering Committee.
- Keeping a good notebook! Make sure to follow best practices and any guidelines from your lab group, but here are some general tips.
- IMPORTANT: Before you start any work in the lab related to this bootcamp, make sure you have completed ALL of your institution’s safety requirements.
Structure
Each stage of the DBTL cycle has been separated into modules. These modules are interconnected, for example, the output of your Design Module, will be the input for your Build Module. But you will also be able to use each module independently. We have provided all the files and the data that you will need to get started for each module in this repo. And the parts, plasmids, and fluorescence calibrants are all in the iGEM Distribution Kit!
What will you do in each module?
Design Module
In the Design Module, you will model the level of GFP being expressed from a constitutive promoter and use design tools to in silico assemble three GFP constructs using Golden Gate Assembly (GGA). No lab work is needed!
Build Module
In the Build Module, you will assemble three GFP reporter constructs in the lab with Golden Gate Assembly, specifically using the iGEM Type IIS Assembly Standard. You will be introduced and taken through our recommended protocols required to do this. By the end of this module, you will have the physical samples of your constructs.
Test Module
In the Test Module, you will measure GFP expression and cell density with a plate reader. Using the constructs you assembled (or previous InterLab constructs) you will follow a protocol that will produce calibrated measurements of fluorescence.
Learn Module
Finally, in the Learn Module, you will analyze the data produced in the Test Module. You will use that data to inform your model, choose the right construct for your project’s goals, and how you would enter the next DBTL cycle.
How do I get started?
The best way to start is to read through this documentation! Start with this Introduction, and review the summaries for each module within the Structure section. This will give you the best overview of what this Bootcamp offers, and where you might want to start. We do recommend starting with the Design Module though!
What exactly am I designing/building/testing/learning?
![]() A simplified diagram of the kind of transcription units you will build: promoter, ribosome binding site (rbs), coding sequence (cds), terminator, in a plasmid backbone.
A simplified diagram of the kind of transcription units you will build: promoter, ribosome binding site (rbs), coding sequence (cds), terminator, in a plasmid backbone.
You will assemble constitutively expressing GFP devices as a transcription unit in a plasmid. We have included introductions to the parts: constitutive promoters, ribosome binding site (RBS), coding sequence (CDS) for GFP, and terminator, and the plasmid backbone (destination vector).
The Parts (& Plasmid)
We have provided the parts and their sequences needed to complete the DBTL Bootcamp, both as the part itself and as a part in backbone. These have all been added to the iGEM Registry (Registry for short), so we have included links to their respective part pages. We will use the SBOL visual standard for representing designs, singular parts, and even interactions.
Here we will go over the function, constraints, and considerations related to these.
We have ensured that everything is correct for these sequences and their associated samples, but it is also important to consider for yourself…
- Is the part’s sequence documented correctly?
- Will the sequence work for the assembly approach you have chosen?
- Is the sample of this part fully sequence confirmed?
Golden Gate Assembly
For the DBTL Bootcamp, we will use Golden Gate Assembly, which allows for the efficient and precise assembly of multiple DNA fragments into a single construct using Type IIS restriction enzymes and T4 DNA ligase.
But more specifically, we will be using the iGEM Type IIS Assembly Standard for building a transcription unit. The assembly standard is what defines the rules for DNA part constructions: which Type IIS restriction enzyme(s) are needed, what are the defined fusion site overhangs of all parts in the schema (syntax), etc. We will go into that in more detail below, as the choice of assembly standard will also impact Design Considerations.
NOTE: Golden Gate & Type IIS Assembly
Sometimes in iGEM documentation and resources the term “Golden Gate Assembly” and “Type IIS Assembly” are used interchangeably. This may be confusing because we have also have an assembly standard called iGEM Type IIS. In this Bootcamp dcoumentation we will refrain from using the more general Type IIS Assembly term, but it may pop-up elsewhere.
Design Considerations
You will see Design Considerations for some of the parts below. These sections are included to highlight the genetic design choices that were made for designing these parts for this bootcamp. These are added so you can think about the design choices you may need to make for your genetic devices.
Plasmid Backbone: pSB1C3 and pSB1C5
When we describe a part in a complete plasmid as either a physical sample or in silico representation, we will reference this as a part in plasmid backbone (or part in backbone for short).
All of the basic parts used in this bootcamp will be in the pSB1C3 series of backbone or its derivative, pSB1C5. These are high-copy Chloramphenicol resistant plasmid backbones, with widespread usage in iGEM.
What’s the difference?
The only difference between the pSB1C3 and pSB1C5 is that the pSB1C3 series maintains the BioBrick prefix and suffix. For the purposes of this bootcamp, this is not useful (or usable) as we will use the iGEM Type IIS Assembly Standard.
Promoters: Anderson promoters
The Anderson promoter collection is a set of constitutive σ70 transcriptional promoters for protein expression in E. coli. Numerous iGEM teams and academic studies have included the Anderson promoters, and they are some of the most used and well-characterized parts in the Registry.
We will use a subset of five of these Anderson promoters.
These five promoters have been used in previous InterLaboratory studies, and they cover a range of promoter strengths, from strong to weak. We will discuss these promoters further, including available data, in the Design Module’s Modeling section.
RBS
The ribsome binding site (RBS) you will use is a variant of BBa_B0034, BBa_J428038.
Design Considerations
A key difference here is that BBa_J428038 also includes an extra 6bp downstream (see diagram below). Along with the fusion site for CDS parts (AATG), this will create a 8bp spacer between the Shine-Dalgarno sequence and the ATG.
CDS: Green Fluorescent Protein
The green fluorescent protein (GFP) coding sequence (CDS) you will use is a iGEM Type IIS variant of BBa_E0040, BBa_J119040.
Design Considerations
BBa_E0040 is the most commonly used GFP in the Registry. However, it contains a BsaI site within its sequence which makes it incompatible with the iGEM Type IIS assembly standard. The variant you are using, BBa_J119040, has a single base pair substitution (base 648) to remove the BsaI site by changing a C to a T.
Terminator
The terminator you will use is a variant of BBa_B0015, BBa_J428092.
Design Considerations
BBa_B0015 is the most used terminator in the Registry. This variant includes a 5’ AA sequence, that when taken with the 5’ fusion site for terminators (GCTT) would create a stop codon preceding the terminator (5' GCT TAA BBa_B0015).
While the CDS we will use, BBa_J119040, has a stop codon (two in fact!), some Golden Gate Assembly Standards or samples, may not have the stop codon at the end of the CDS sequence. This design allows this terminator to include a stop codon in those cases.
Plasmid backbone with Drop-Out / Destination vector
The pTi plasmid backbone was developed by the Federici Lab. It is a Kanamycin-resistant uLoop compatible (Golden Gate) plasmid backbone that is similar to the pET28a vector.
The Reclone network has some very helpful documentation and experience on the pTi plasmid backbone.
We have incorporated the pTi plasmid backbone into the Registry as pTi (BBa_J434150) paired with an RFP expressing drop-out (BBa_J434151).
For the Design Module, you will use the pTi plasmid backbone for in silico assembly. For the Build and Test Module, you will assemble and express your constructs in the pTi plasmid backbone.
Example Transcription Unit
MoClo / iGEM Type IIS Assembly Standards
The parts and backbone you will use have the overhangs (fusion sites) that adhere to the Modular Cloning (MoClo) and iGEM Type IIS Assembly Standards for building a transcription unit.
Fusion Sites
As you look through the figure and table above you will notice that the fusion sites flank the part, but do not belong to the part itself.
As an example, GGAG and TACT are not included in the sequence for the promoter part BBa_J23101 (TTTACAGCTAGCTCAGTCCTAGGTATTATGCTAGC).
However when we have the part in backbone (promoter_BBa_J23101_in_pSB1C3SA.gb) and have excised it with BsaI, then the part extract will include those overhangs flanking BBa_J23101.
CDS Fusion Site: AATG
There is an exception here though. The 5’ CDS fusion site (AATG) can be considered just A, as the start codon (ATG) of a CDS will belong to its part sequence but also overlaps with the fusion site.
As an example, we have the partial sequence of our GFP (BBa_J119040), underlined, with the fusion sites for a CDS in brackets [ ] also added. [AATG]CGTAAA...AAATAATAA[GCTT]
- the start codon
ATGand the stop codonsTAATAAare included in the sequence of BBa_J119040- the start codon
ATGoverlaps with the designated5'fusion site[AATG]- the
Athat is5'of theATGfusion site in[AATG]is NOT included in the sequence of BBa_J119040- the
3'fusion site [GCTT] is NOT included in the sequence of BBa_J119040
Transcription Unit Assembled
When assembled, those fusion sites that flank a part sequence will become scars, artefacts of the assembly reaction. In visual representations these are usually not included, but we have provided the above diagram to show their location in a typical transcription unit.
Hierarchical Assemblies
Finally, Golden Gate Assembly is an extremely powerful assembly technique and can be made more complex with when an GGA-based assembly standard supports hierarchical assemblies, where you would be able to assemble multiple transcription units to create larger genetic circuits. This may be a consideration for your own project which you will need to include in your Design process. But for this bootcamp, all you will need to be prepared for is the above!